Zum Inhalt springen
  • Das GSF wandelt Links in Affiliate Links um, um ggf. eine Provision erhalten zu können. Gerne nutzen bitte, danke! Mehr Infos, wie ihr das GSF unterstützen könnt, findet ihr im GSF Support Topic.

MV 150 Sprint (1966) o-tuning and restoration


Empfohlene Beiträge

*My mother tongue is Czech, but I can speak English. I will write in English, but feel free to respond in any language you want. I hope it´s OK ;-)*

Hello!
This is my first topic in the "oldie" section and I hope I did not messed up something by creating a new topic for MV Sprint. Here I would like to show and conversate about MV Sprint with 04C engine number from 1966 and on it´s o-tuning and my future restoration. 

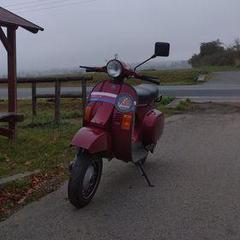
About my MV... I bought it in 2018 at Mannheim from Spanish friend for what I think was a good price. It was rough and scrached a lot! The engine did no ran (at the spot), but it had clean registration and was in sort of presentable shape.

IMG_20181013_140526.thumb.jpg.defd1c2bcb986ffe41e732b9c68d57e7.jpg
After coming home next day, I cleaned carburetor and put gas into external tank (mine was cloged) and it ran good. Because the rear wheel seal was leaking and I did not know anything about this engine, me with my dad (because back then I basically did not know anything about two strokes and engines) decided to rebuild the engine. I quickly found about the differences of the construction from Italian models and succesfully sources what I needed. After rebuild I got it registered, but could not ride since I did not have a A2 drivers licence...  After some time I got my licence and I had about two weeks to befriend and learn on my Sprint, because VWD2019 was happening!
IMG_20181121_160850.thumb.jpg.4bae2b774a5d7ccfe65829b6ed7636a1.jpgIMG_20190921_141956.thumb.jpg.7d0c04d908dee1c70a60001d20f27034.jpg
After that my dad helped me set my carb correctly and from that point - summer 2019 until late summer of 2020 - I did NOT touched the scooter at all! (apart from reupholstering the seat) And I was daily riding without problems for about 5500km (which I think is amazing for 55 year old scooter with an old 6V system!) then it started having a lot of issues. It was starting very rich, carb was leaking (even after resealing and checking everything) and the mixture screw was tight at it could be. Then it also started leaking gearbox oil and the front suspension was like a pogo stick, which did not brake at all! So basically after no servicing (because I was dumb :wacko:) for more than year, I decided this spring to modernise the scooter (on a budget) and do proper maintanance since I gained some knowledge after 2 years.

The plan:
1. Replace tires (Crappy low budget Mitas for more quality Heidenau tires)
        - used Heidenau KR80sr 3.50-10
2. Replace front suspension
        - replaced only the front damper
3. Change brakes
        - Replated only front pads, back was breaking good.
4. Stop the oil leak
        - Replaced leaking o-ring at clutch cover
5. Change the carburetor for more modern type, because I gave up on the UA19S1 - I could not set it properly :wallbash:
        - want to use a Dellorto PHBL 26BS, because I got it some time ago and it is only sitting on a shelf 
IMG_20210319_181537.thumb.jpg.f3d72229b92d1d76576d8a2df8144b8e.jpg

6. Replace 6V ignition for 12V
        - want to use a Bajaj 12V ignition for small cone cranks. Are they reliable, what is your opinion on them?

Bearbeitet von msk_motori
Link zu diesem Kommentar
Auf anderen Seiten teilen

But the plan kind of changed to o-tuning project (on budget), thanks to...


 @Pholgix MV 150/S2 topic

 @andreasnagy MV 150S 1964 topic.


I already read those topics and decided to redo my cylinder. First of all, there´s some pictures after dissasembly (Spark plug is new, so don´t look at color)
 

IMG_20210318_115536.thumb.jpg.0d4607a842b1a17f92c8699745d44f07.jpgIMG_20210318_115610.thumb.jpg.59f11ddf8cd26bc3b4a94876102d07bf.jpgIMG_20210319_103740.thumb.jpg.97eb9d86d053cf1d004a449bc2abd489.jpgIMG_20210318_184901.thumb.jpg.7dffcc8398cd72b79fc2e4dc07125d64.jpgIMG_20210318_160956.thumb.jpg.a93e9bcc17ae61dba18c48a1f7d9bd81.jpgIMG_20210319_142851.thumb.jpg.d4e0b2e998d124b9881e84a0b0138212.jpgportmap_ori.thumb.jpg.17e32798b52b4d2fd198d31eab24f096.jpg


So after seeing the measurements, I had the timing of...
Transfer 120°
Exhaust 147°
Blowdown 13,5°
Exhaust width 60,5%
Inlet 127° (symetrical 63,5° in TDC and BDC)
 

So after consideration I redone the cylinder without base gasket to 
Transfer 120°
Exhaust 154°
Blowdown 17°
Exhaust width 60,5%
Inlet 133° (symetrical 66,5° in TDC and BDC)


portmap_tuning.thumb.jpg.9057a8a2d2948eb7b649405a7498d58c.jpgIMG_20210318_184910.thumb.jpg.cf4ce04e99827e8a431b501e439d8a2c.jpgIMG_20210319_144330.thumb.jpg.d600efda2c70e7c69cc225d2014cb3a6.jpgIMG_20210319_112111.thumb.jpg.92a632498b185662b7b4bbad455165bc.jpgIMG_20210319_114927.thumb.jpg.cb6bb1b22a20d0210c63730c4b8263b7.jpgIMG_20210319_150535.thumb.jpg.2c42dca1af20d23fb4c8d2ecd5c092bb.jpg


I also did not touch the piston, exept cleaning it on the top. 


Rest of the setup:
- Original MV 150 exhaust for now, but in the future I would like to get a SIP Road 2.0 for MV or Polini box for PX, but I would have to modify the exhaust inlet.
- Dellorto PHBL 26 facing towards back (still need to create manifold and sort the air filter position)
- Original gearbox, primary and clutch

- Head ???
- Ignition ???


Now... I also have some questions...
Should I use the Bajaj 12V ignition?
On ebay, I found one for 47eur...
I would like to use different head, since mine has the spark plug thread a bit destroyed... What would be a good compresion ratio? I was thinking about (10:1 - 11:1)

        - I don´t really want to source a Bajaj head...
        - my friend might have a PX 150 (d.58) head, that I believe might have better compression than original MV
        - or should I search DR135 (d.60) cyl head or with that size diameter, it would not work? 
With what carburetor setting would you start? With what atomizer, needle, slide?
        - I thought about modifing the basic setting of carburator
            60 slide
            D36 needle
            270K atomiser
            122 main jet
            30 idle jet
        - into changing just the idle jet (just for basic start and maybe a small ride, if everythings works out good)
            60 slide
            D36 needle
            270K atomiser
            122 main jet
            50 idle jet       


Bearbeitet von msk_motori
Link zu diesem Kommentar
Auf anderen Seiten teilen

Am 23.3.2021 um 01:19 hat msk_motori folgendes von sich gegeben:

I would like to use different head, since mine has the spark plug thread a bit destroyed... What would be a good compresion ratio? I was thinking about (10:1 - 11:1)

        - I don´t really want to source a Bajaj head...
        - my friend might have a PX 150 (d.58) head, that I believe might have better compression than original MV
        - or should I search DR135 (d.60) cyl head or with that size diameter, it would not work? 


As far as I know, the only difference between MV and Piaggio Heads is the thickness of the sealing surface. The thickness of the two heads I've seen, was very huge! This was the only reason why I used a Piaggio head, because I grinded the sealing surface down by rotating on sandpaper on a birch plywood - and with the MV head it would've taken hours.

I think if you poor down the squishband to 1mm it would result in about 10:1 9.5:1, but I would not go further than 10:1 ...especially with that ignition.


If you are lucky you'l find a "RAMP" LML150 Head:

https://www.germanscooterforum.de/topic/358163-sammlung-zylinderkopf-geometrie/


Zylinder: I would set a small chamfer on the edges of the transfer inlets, otherwise your Pistenrings might be scraped down fast...have you measured the thickness of your rings?(radial direction)


Bearbeitet von Pholgix
Link zu diesem Kommentar
Auf anderen Seiten teilen

So my friend has found this cyl head, I thought I could use it since mine is bit damaged. I thought I will modify it in a same way you did...
Out of curiosity, from what 150 might this cyl head be? Could be VBB or Sprint?

164995528_1380328275649532_1503780700030367584_n.thumb.jpg.fa9559fad4bca16ca31da8ed2c966bc5.jpg
 

Am 25.3.2021 um 21:18 hat Pholgix folgendes von sich gegeben:

Zylinder: I would set a small chamfer on the edges of the transfer inlets, otherwise your Pistenrings might be scraped down fast...have you measured the thickness of your rings?(radial direction)


Yes, I chamfered all edges a bit so the rings would not catch. I did not measured the rings radialy, but just by looking, they seems to have a good thickness all around. But I measured the piston ring gap and they are just a bit worn out, but since the cylinder has still good compression, I decided to leave them. I don´t think they will cause me problems, but if I will be restoring the MV in the future, I will definitely have the cylinder rebored/redone.

Link zu diesem Kommentar
Auf anderen Seiten teilen

  • 2 Wochen später...

So progress after a week... 
My dad basically created a manifold for me, mainly because I don´t know how to use welder, but I want to learn it in the summer... 
It was created using 5mm plate for the inlet base on the cylinder, 2mm plate for the transition from the round hole to square hole and from 90° pipe used around radiators and stuff (internal diameter 27mm).
It may be improved over time, but for now, it works.

IMG_20210331_195348_1.thumb.jpg.fe541400b66d8d00b7d56165d953dd9e.jpgIMG_20210331_195338_1.thumb.jpg.ed694ce2ea5d93c5c92e514932e8158b.jpgIMG_20210331_195411_1.thumb.jpg.a0d72d929676f4f502c6047200ffecc2.jpgIMG_20210331_195400.thumb.jpg.13f9e2a485cb6b51cab9673d215dbfad.jpg 

After that I test-fitted it, painted it black with high temperature paint and mounted it, ready for first start...

IMG_20210403_123645_1.thumb.jpg.ad6f2ea1d97402b4b6874ffe28fe09b7.jpg
 

Initial setup of the carburetor was a bit different from what I wrote last time... My carb came with different parts, so first setup was:
            50 slide
            D34 needle second frop top
            270K atomiser
            122 main jet
            53 idle jet
            60 starter

After many failed attempts, it seemed like it was wayyy too rich and basically it ran very poorly just for 4 seconds. It also kicked back real hard when I wanted to start it... So after a day, that I wasted with this, I sat down and found dellorto´s manual for setting carburetors. So I came up with a second setup with pieces from phbl 24 which I have on my Polini 130. I also cleaned and redone my ignition with 0.35-0.40 gap and set it up and 23-24° BTDC

            40 slide
            D22 needle 2nd clip from top 
            270K atomiser
            122 main jet
            50 idle jet
            60 starter
Funny enough, my dad was that day with me and just for fun said... "lemme see how it runs" It was a cold start so I switched the choke on and right on the FIRST kick it fired right up! I was sooo happy, because I did not thought that I would get it running by myself with no help from others. So after fine tuning, just on the stand (It´s cold outside and I don´t have a throttle cable long enough to fit it.) I finalized my
starting base setup...
            40 slide
            D22 needle 1st clip from top 
            270K atomiser
            122 main jet
            50 idle jet
            60 starter
            idle screw 3,5-4 turns out
            mixture screw 1,5 turns out
The engine runs real nice, starts nice, I think the response is great and it doesn´t kick back... If you want you can hear it on video.


So now, I need to order some parts, like slide, jets and needle and I need to sort out my air filter situation, because there is not much space... Quattrini M1XL has that much space also for an air filter, so I will take inspiration from there.
 

Bearbeitet von msk_motori
  • Like 1
Link zu diesem Kommentar
Auf anderen Seiten teilen

Erstelle ein Benutzerkonto oder melde Dich an, um zu kommentieren

Du musst ein Benutzerkonto haben, um einen Kommentar verfassen zu können

Benutzerkonto erstellen

Neues Benutzerkonto für unsere Community erstellen. Es ist einfach!

Neues Benutzerkonto erstellen

Anmelden

Du hast bereits ein Benutzerkonto? Melde Dich hier an.

Jetzt anmelden
  • Wer ist Online   0 Benutzer

    • Keine registrierten Benutzer online.

×
×
  • Neu erstellen...

Wichtige Information